
How to Make a Holiday Rosette Bow

Easter rush was through, and I had found the perfect dress for my five-year old diva. It was modest, fashionable, beautiful, and to my dismay nothing matched it. I scoured the expensive boutiques for the perfect hair accessories to crown my organza-frocked beauty. My frustration mounted when I finally found the trophy bow, and it cost nearly as much as the dress itself. So, being exceedingly frugal in my shopping exploits, I decided to be independent and crafty and try it out for myself.
I raided the local craft store with a mission, and found that with a budget of approximately five dollars, I could make my own hair ornaments, for a fraction of the price. But, Easter fashion necessity turned into St. Patrick’s Day and then summer soccer league called for soccer bows. Now, my little daughter has a hair bow for every holiday and possible occasion, and to match even the most difficult ensembles.
My favorite is the rosette because it looks dressy and complicated, but it is simple and easily customized for any occasion.
First, start by choosing your ribbon. Some of the choices for this demonstration came right off the dollar rack at my local Michael’s craft store.
Some of my favorite websites and manufacturers are
www.offray.com- this is available at your local craft store, and is in fact the most common brand I have found.
www.americancrafts.com- has many varieties that are designed to coordinate and compliment each other.
www.theribbonretreat.com- is a website dedicated entirely to ribbon crafts and have some wonderful printed varieties and pre-matched sets to simplify if you are feeling uncertain of your creativity.
www.houseofribbon.com- has some really fun prints and is categorized by width of ribbon which is helpful for the rosette project.
When making a rosette, I always start with my widest ribbon and then make the inner layers with the more narrow varieties. For this bow I cut six nine-inch strips for the bottom layer, then five eight-inch strips for the next layer, and four seven-inch strips for the subsequent layer, and then four six-inch strips for the inner-most layer. I never cut less than four strips for a layer because the rosette begins to look thin and leggy.

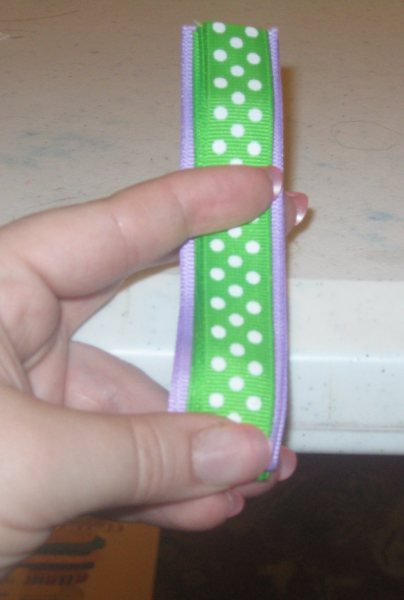
Take all six strips for your first layer and stack them neatly together. Fold them in half and using a needle and knotted thread, run your thread directly through the middle.

Arrange the six pieces evenly in a sunburst.

Fold the first piece to the center and stitch in place. This step can be completed with a twist to make a different look to your rosette (illustrated in the lower picture). Repeat this step all the way around your ribbons, being sure to stitch securely in the center. Make a knot to hold your stitching and the rosette in place.


Repeat these steps for the other layers.

Then begin to stack. Run your needle several times through your layers to stitch them together (this will be very difficult because of the layers involved, so be careful).

I like to use these simple French barrettes, which are available at Michael’s or at either www.theribbonretreat.com or www.houseofribbon.com. They usually come in packages of 20 pieces for less than $3.00. I carefully disassemble the barrette to facilitate sewing the barrette to the rosette. I then take several whip stitches to secure the bow in place.
Using a hot glue gun, cover your stitches for added support, and secure a centerpiece. For these I used a resin centerpiece from www.dressitup.com. Other centerpieces are widely available, but I also have used embellishments from www.hairbowcenter.com or a silk flower from the floral arranging section and sometimes even simple buttons from my leftover button bottle.

I like to make my bows in pairs so that I can use them for double ponytails, or even have one ready to give away for a birthday party. I find that one spool of three yards of ribbon will make me at least two, if not three or four bows, making this project fashionable and economical.

And a more festive one for trick or treating.
This is one completed using the twisted method shown above.
 by Chaundra

