
Bread Machine Hamburger and Hot Dog Buns
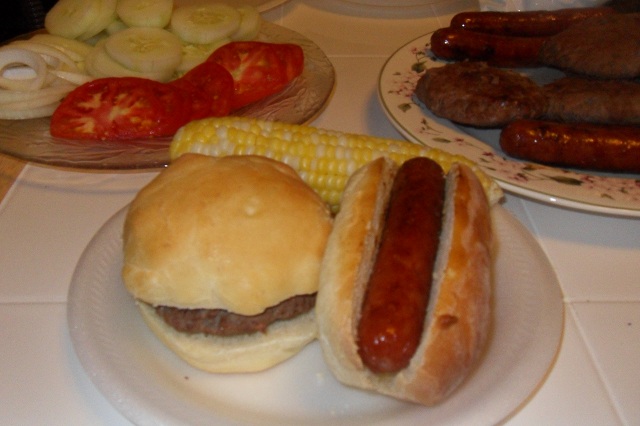 Have you ever wanted a hot dog or hamburger, but had no buns in your pantry for them? Maybe you also just did not have any more money left in your food budget to buy them. Why not make them yourself, from scratch? Sound a little too hard for you? You should consider using your bread machine to do most of the work for you. I tried several recipes until I came upon this one from Full Bellies, Happy Kids and this is definitely my favorite. You will never want to go back to store bought buns after tasting these homemade ones.
Ingredients
1 ¼ cups milk, slightly warmed (I used skim milk) ($0.13)
1 egg, beaten ($0.10)
2 tablespoons butter, softened at room temperature ($0.20)
¼ cup white sugar ($0.10)
¾ teaspoon salt
3 ¾ cups bread flour ($0.47)
1 ¼ teaspoons active dry yeast ($0.25)
Directions
Place all ingredients in pan of bread machine in order according to your bread machine manufacturer’s directions. Select dough setting on your bread machine. When the cycle is complete turn dough out onto a floured surface. Cut the dough in half and roll each half out to a ½ inch thick circle (The original recipe called for 1 inch thick, but ½ inch seemed to work best for me). Then cut out to size for desired buns.
For hamburger buns: Cut each half into six 3 ½ inch rounds with an inverted glass as a cutter. You may have to collect dough and roll out several times to get all six rounds.
For hot dog buns: Cut the one inch thick circle into 6 long hot dog shaped pieces and roll them a little to look like hot dog buns. Make sure they are long enough to fit the hot dog.
Place buns on a greased baking sheet far apart and brush with melted butter (I decided not to brush them with the butter and they still came out fine). Cover the buns and let them rise for one hour or until doubled. Bake at 350 degrees F for about 9 minutes. If they are not done after 9 minutes add a few more minutes until done and slightly browned on the top of the rolls. Cool on cooling rack.
Freezing Buns
You can actually freeze your bun dough. Form dough in one big ball and then place it in a freezer bag and seal getting all the air out. Label and place in your freezer. On the day you plan to use the dough place the dough in a large bowl and allow it to thaw out, it should be ready by dinner time. This will also allow it to rise. You can also do this overnight in your refrigerator and then allow it to rise in the morning after taking it out. Either way has worked for me. Then cut them out and bake as directed in the recipe.
You can also freeze baked buns. The most important thing is to allow the buns to cool completely. After they have cooled completely, I like to wrap them individually in plastic wrap and then in aluminum foil (this helps prevent freezer burn) and then place them in a freezer bag. I place enough buns for one family dinner, in my case six. Then I get all of the air out of the bag and seal and label them and place them in your freezer. When I do this I like to use the buns within a month. When I’m ready to use them, I just defrost them on the counter and then place them in the microwave for about 6-10 seconds.
Extra Buns
These buns also work great as a dinner roll, so if I have extra I will plan to use them for the meal the next day. I just place them in the microwave for about 6-10 seconds and then serve them with dinner. They are always great the next day.
Price Comparison
I estimate this recipe to cost $1.25 for 12 rolls. I found in the grocery that most buns were between $2 for a pack of 8 buns and $3 for a 12 pack. That’s at least a 50% savings and well worth it for me to make my own. I also think the taste is so much better than the store bought. Those factors make me think twice about going back to store bought.


Thank you for sharing this recipe! I plan to try it very soon.
This recipe was great! I also used the dough to make cinnamon buns!