How to Refinish Oak Furniture (the Easy Way)
*This post contains affiliate links.
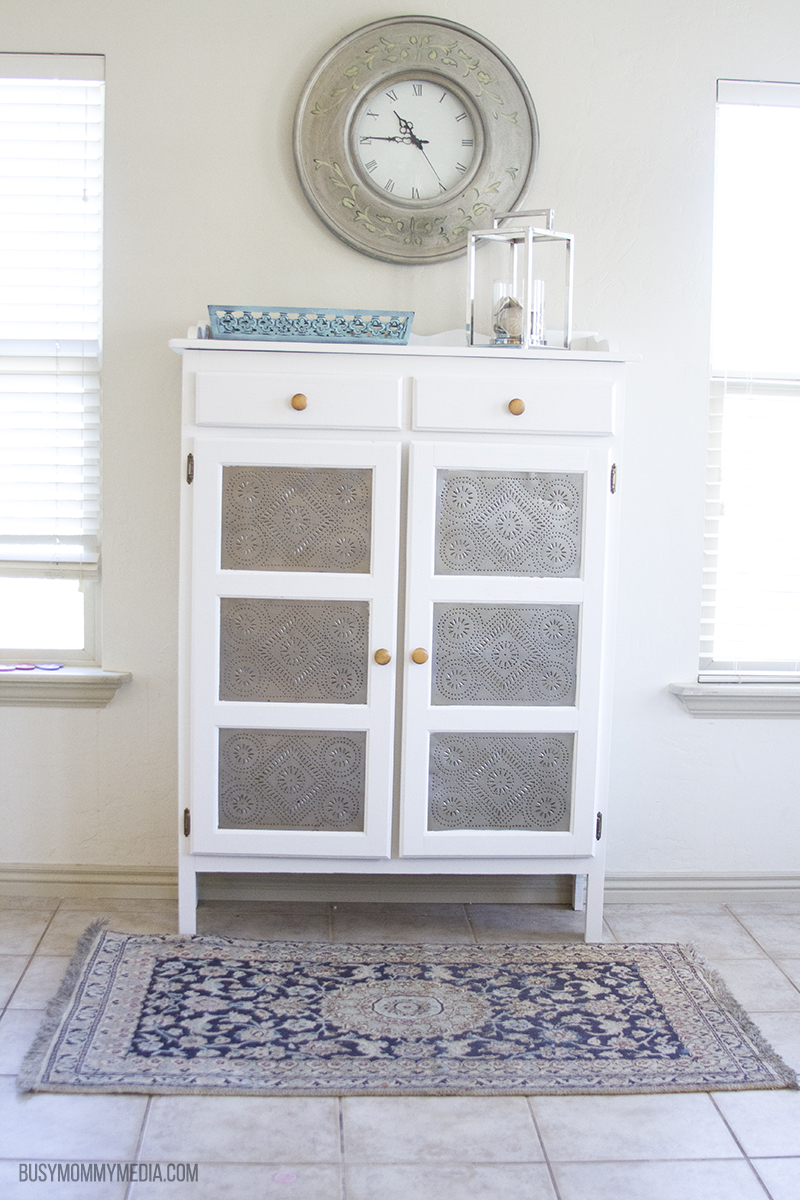
Do you have a piece of oak furniture that needs a bit of a facelift? Refinishing furniture can be a bit intimidating if DIY isn’t normally your thing. I had an old pie safe that I loved and needed a new look, but I needed an easy option. We discovered how to refinish oak furniture without sanding or stripping and the end result is fantastic.

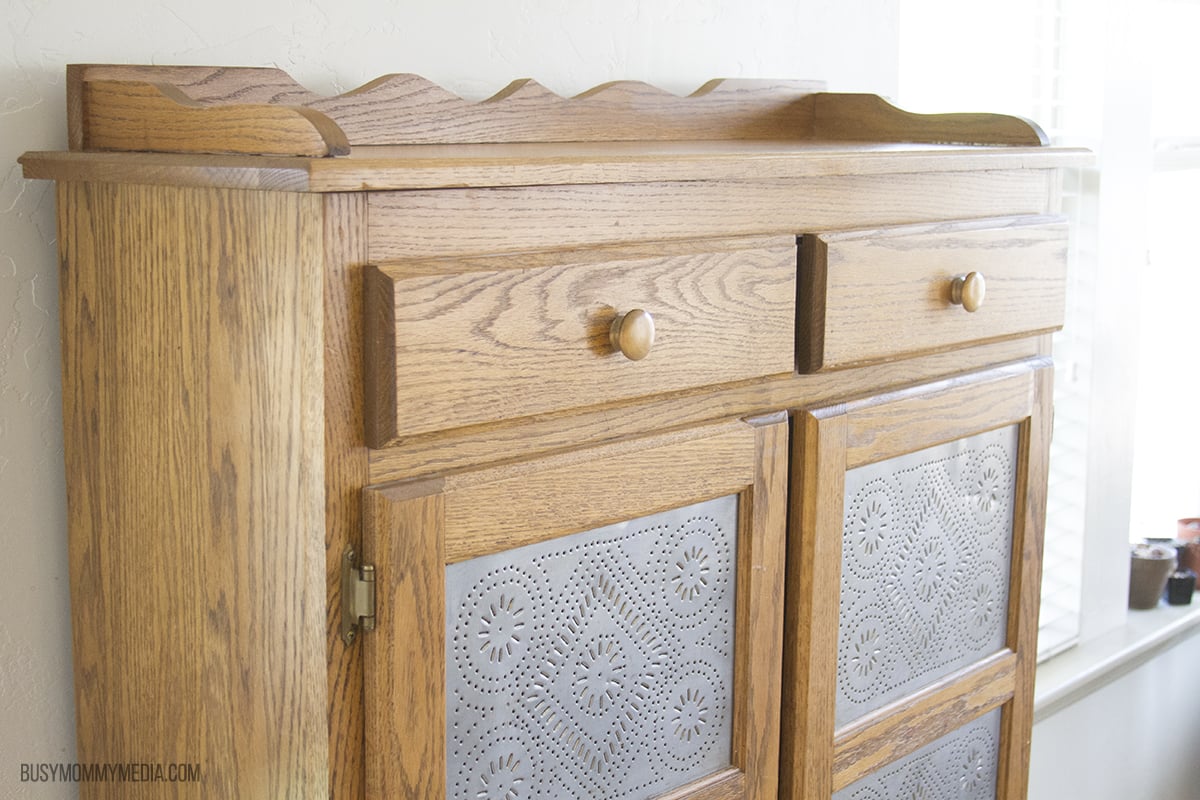
I have an old pie safe in my kitchen that was in my house growing up. It’s the same pie safe that we kept our cereal in when I was a kid and I’m a bit sentimentally attached to it, but the heavy grained oak isn’t very current.
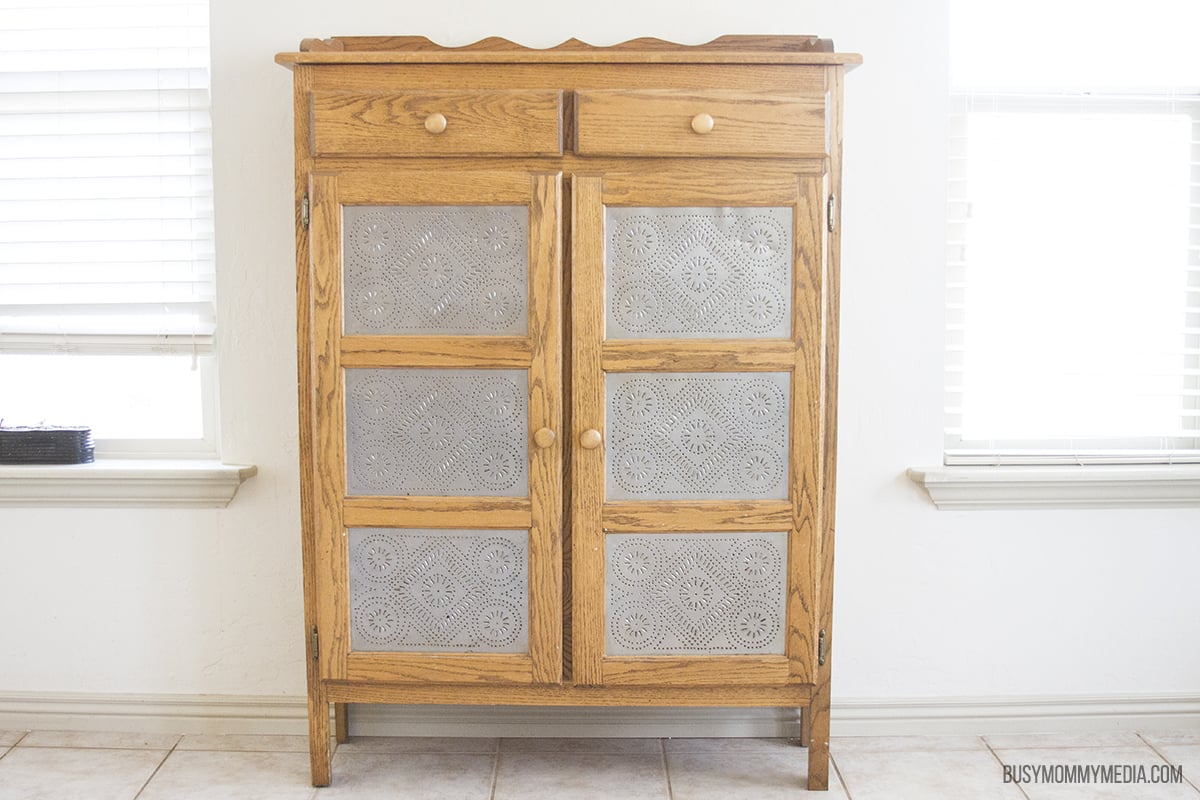
If you’ve never seen a pie safe before, they used to be used to keep pies in as they cooled. The punched tin squares kept bugs off the food while still allowing air flow. The tin work on these is always gorgeous and I love that it adds something a bit unique to my kitchen.
I’ve been wanting to paint it for quite a while, but I’ve been worried about actually doing it. I love the idea of DIY projects, but I’m not very experienced refinishing furniture.
Once I tackled my first project, and was happy with it, I figured it was time to check this one off my list.
Materials Needed
First, I knew I was going to need a few tools to get the job done. I had a long talk with someone at my local hardware store to figure out what the easiest option was. I knew I didn’t want to buy expensive supplies or fully sand this down.
- Sanding Sponge (like these ones) – I didn’t want to fully sand this. I just don’t have the patience or the equipment, but this piece of furniture has been through several moves (and lots of kids) and it had a few dings in it that needed to be smoothed out. We used the sanding sponges to just smooth those out as best we could. We weren’t aiming for perfect, so we just did our best here.
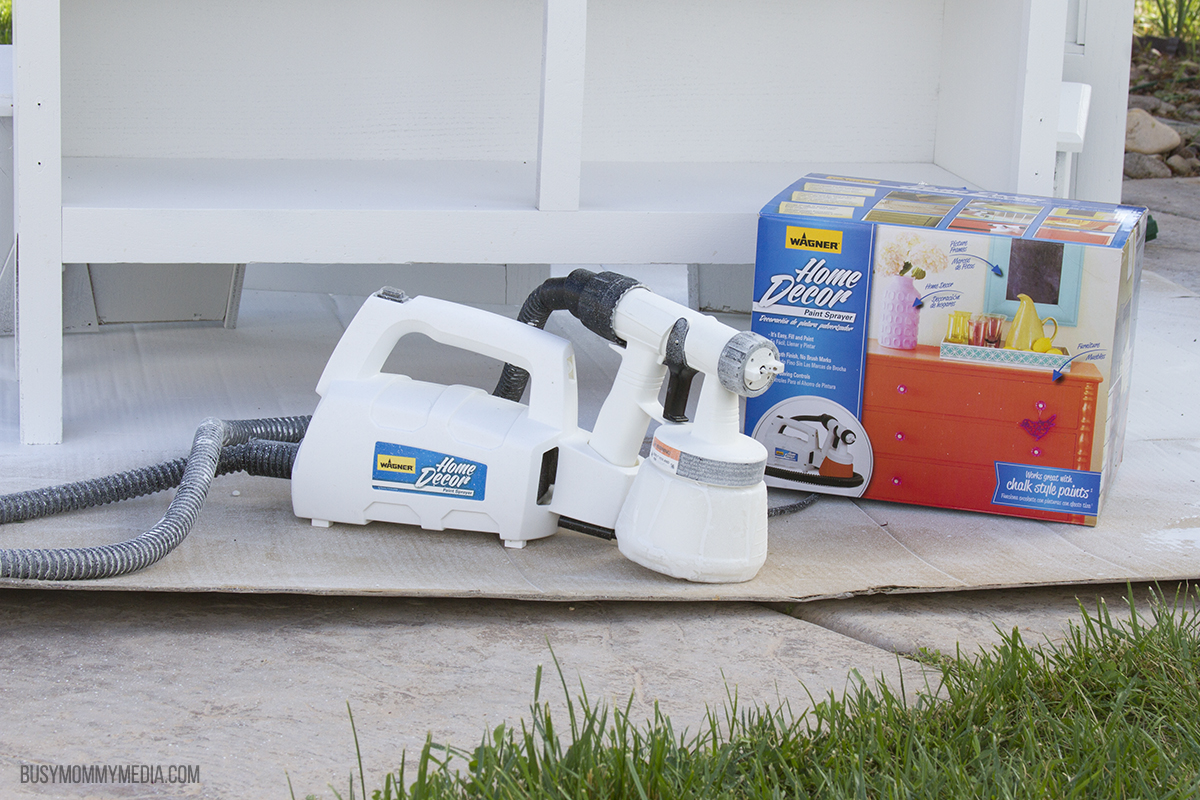
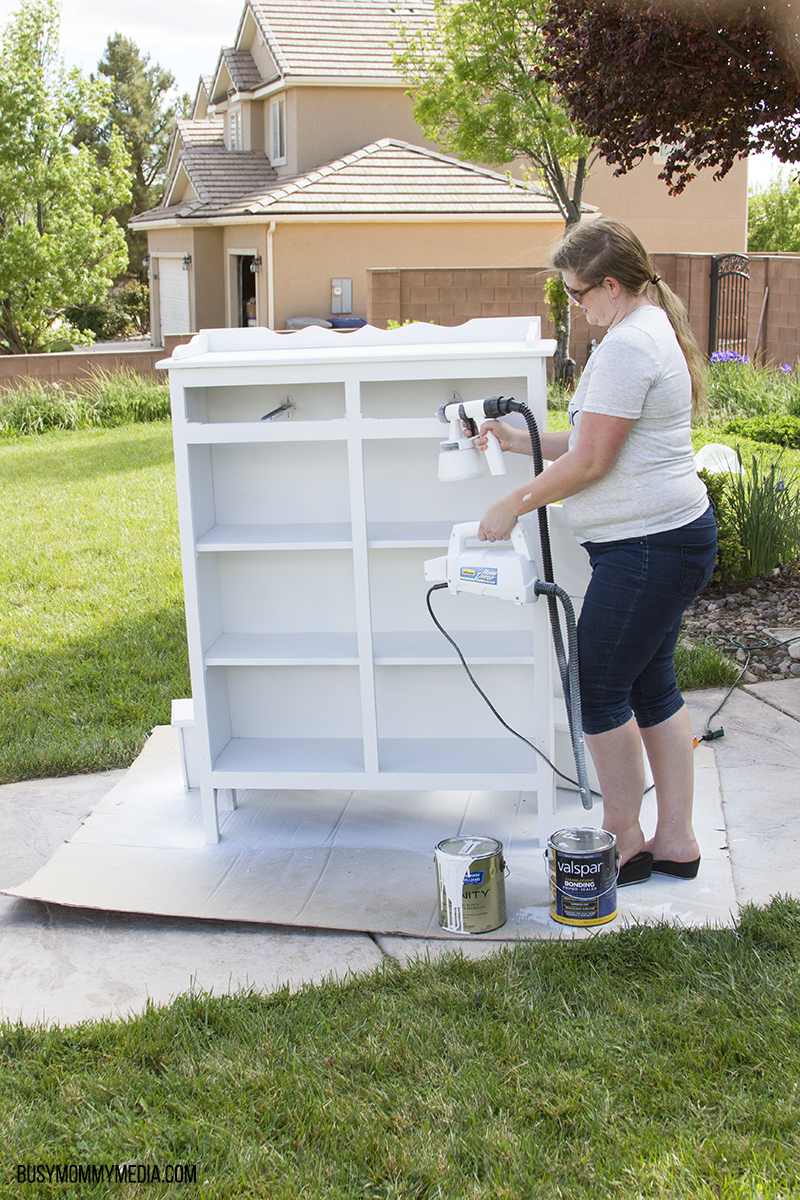
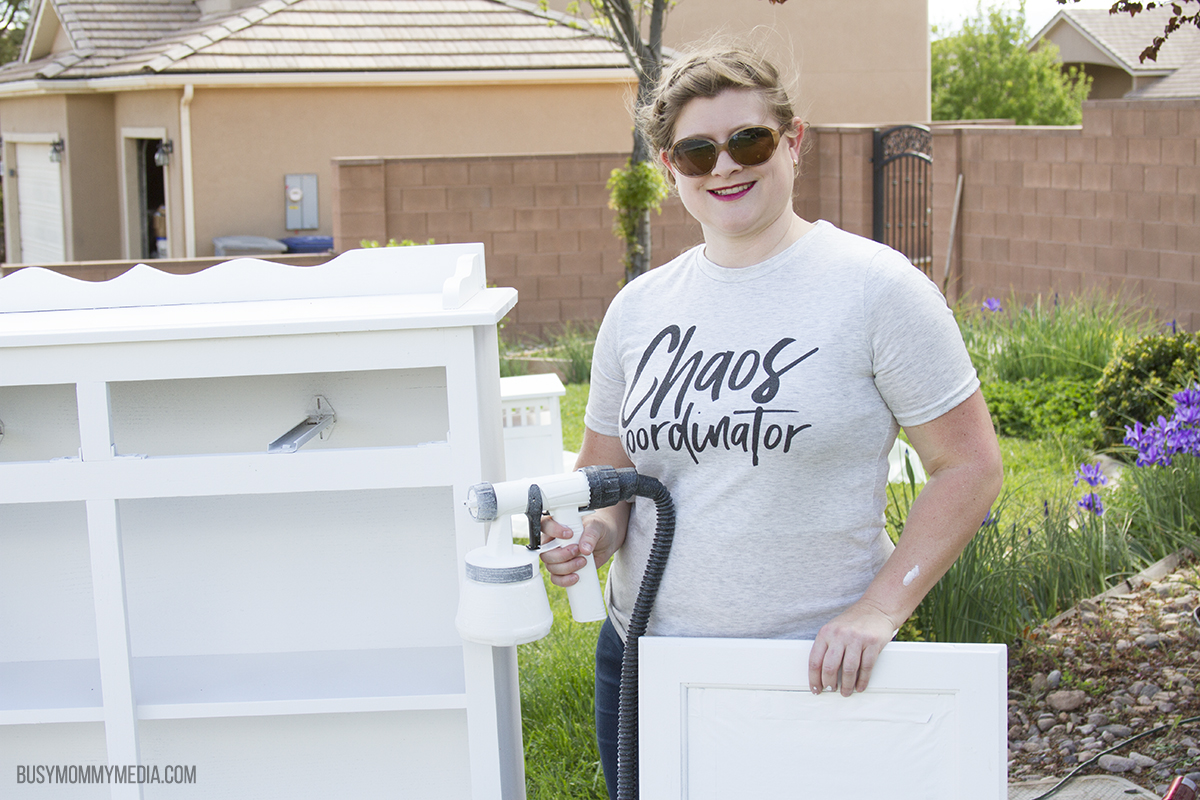
- Wagner Home Decor Paint Sprayer – After using a paint sprayer for the first time earlier last year, I realized that it was definitely the easier way to go. You can get such a smooth finish with this and there’s way less mess. Wagner was kind enough to send me their Home Decor Paint Sprayer and we’ve been using it for all kinds of projects since then. If you know me at all, you know that DIY is not usually something I do. My skills aren’t quite up to par with most of the projects I want to do, but the Wagner Home Decor Paint Sprayer makes it so easy that even I can do it.

- Painting tape – This is probably the most important step. You need clean lines to really make your project look finished. My husband and I are notoriously bad at taping when we paint. We’ve gotten better, but it’s required a lot of trial and error (you’d think this would be the easy part).
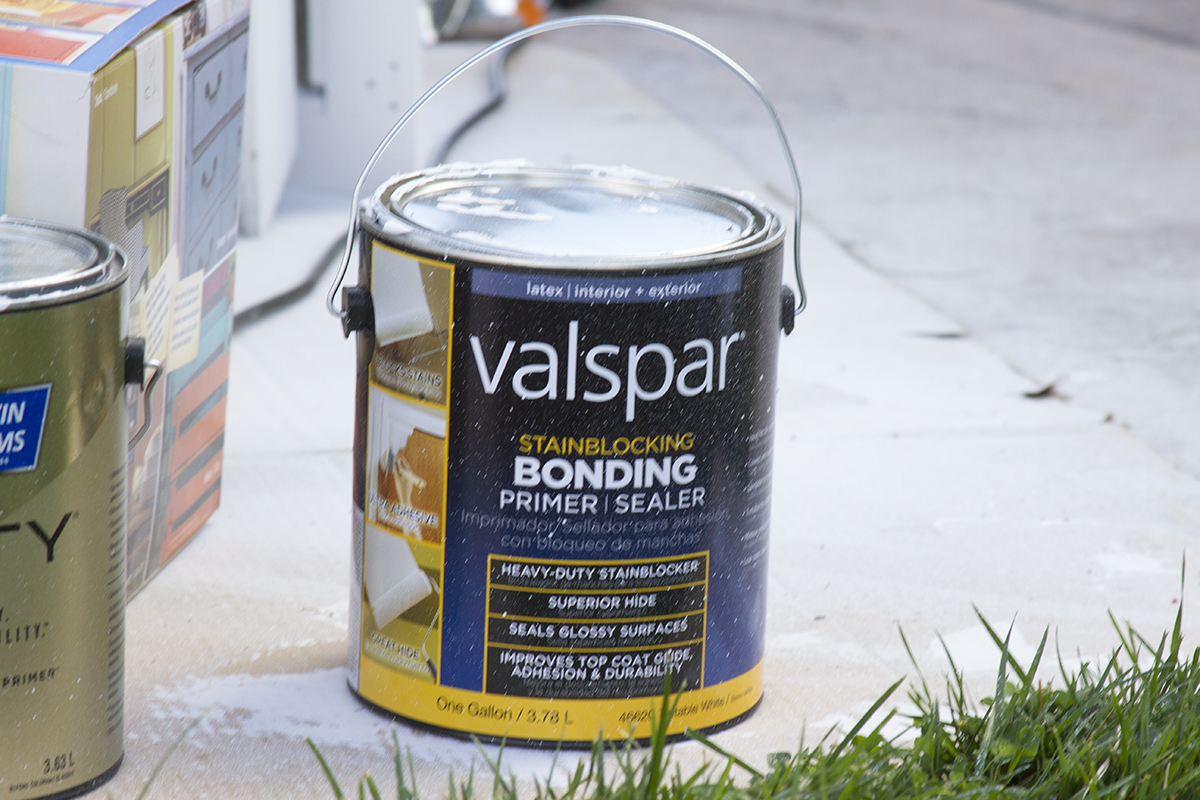
- Bonding Primer – After looking at all our options, using a bonding primer to get a clean finish and avoid stripping or sanding seemed like the best option. We used the Valspar Stainblocking Bonding Primer/Sealer.
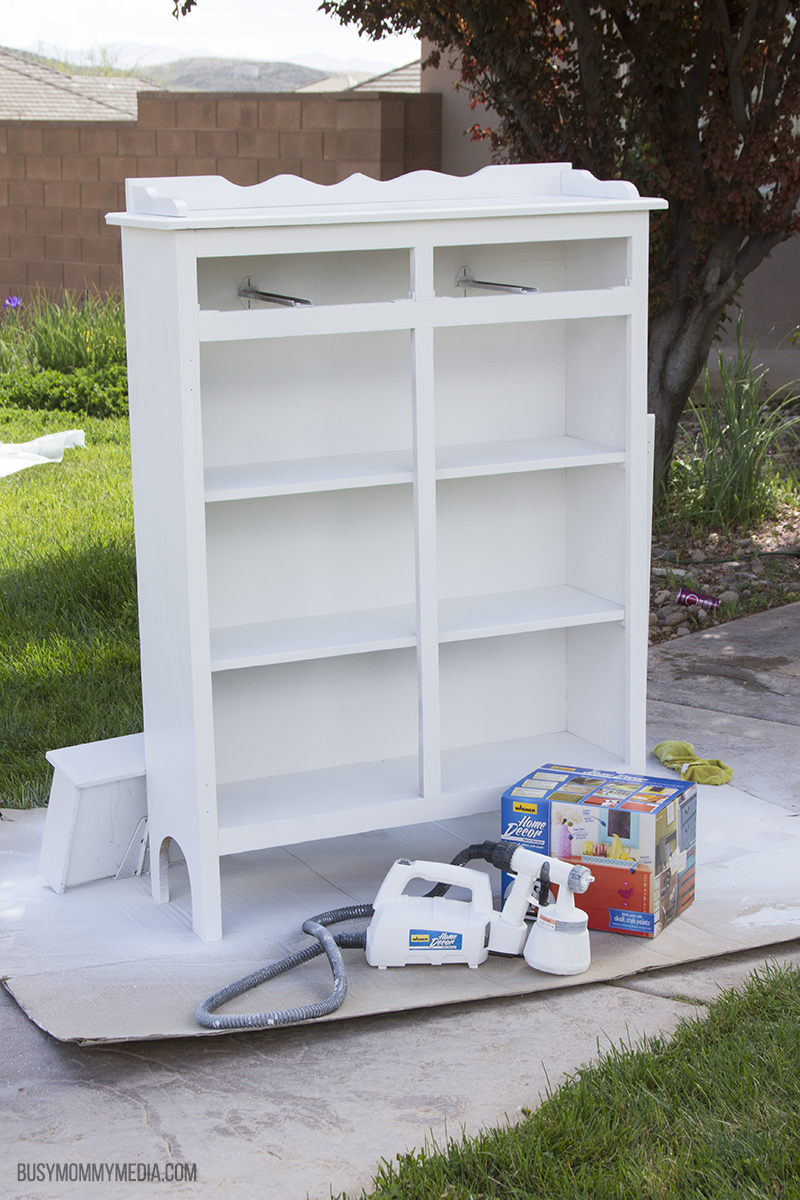
- Good quality paint – Since this piece of furniture is in the kitchen, I knew we’d have all kinds of sticky/greasy little hands touching it. Whatever paint we used, had to hold up to that. We were really impressed with the Sherwin Williams Infinity paint that we used for this project, so we went with it again this time. We only needed one coat and the coverage was great.
How to refinish oak furniture
Now that we had all our supplies, we were ready to get to work. We set up a large piece of cardboard outside and had all our supplies ready to go.
First things first, we removed all the hardware and put it in a plastic bag. We set that aside somewhere safe, because we have had one too many projects where the hardware goes missing by the time we are done.
Next, we got to work sanding. It didn’t take much. We focused on the edges and any rough spots. Then, we washed the entire pie safe down with a soapy rag, wiped it clean, then dried it with a microfiber cloth to get any leftovers dust. You want your furniture completely clean before you start to paint.
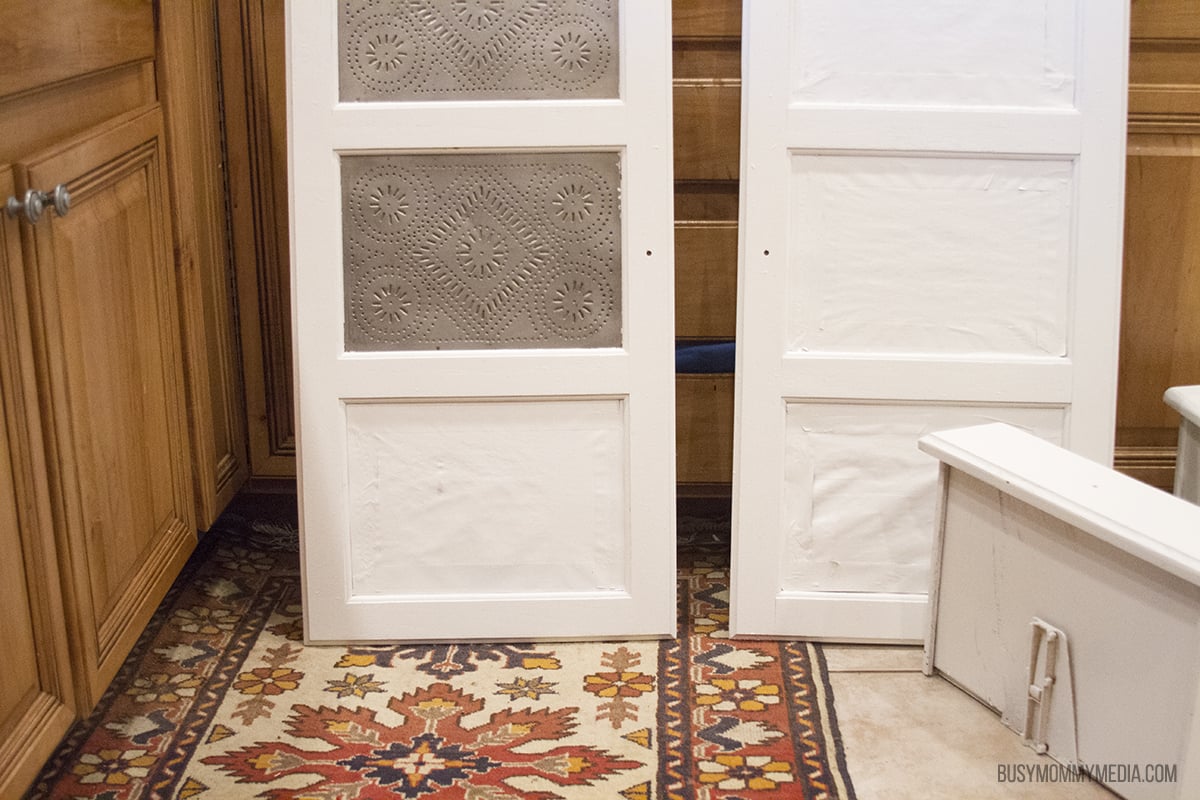
Next up, was taping off the tinwork on the doors. Since we’ve been a bit hit or miss with our taping in the past, we were very careful with this step. We used a blade to tuck the tape right down in the edges. Since we were covering such a large area, we used sheets of paper for the center and taped them around the edge using painting tape.
One thing we learned after our last painting project is you have to remove the tape as soon as possible after painting. This prevents the paint from peeling off when you remove the tape.
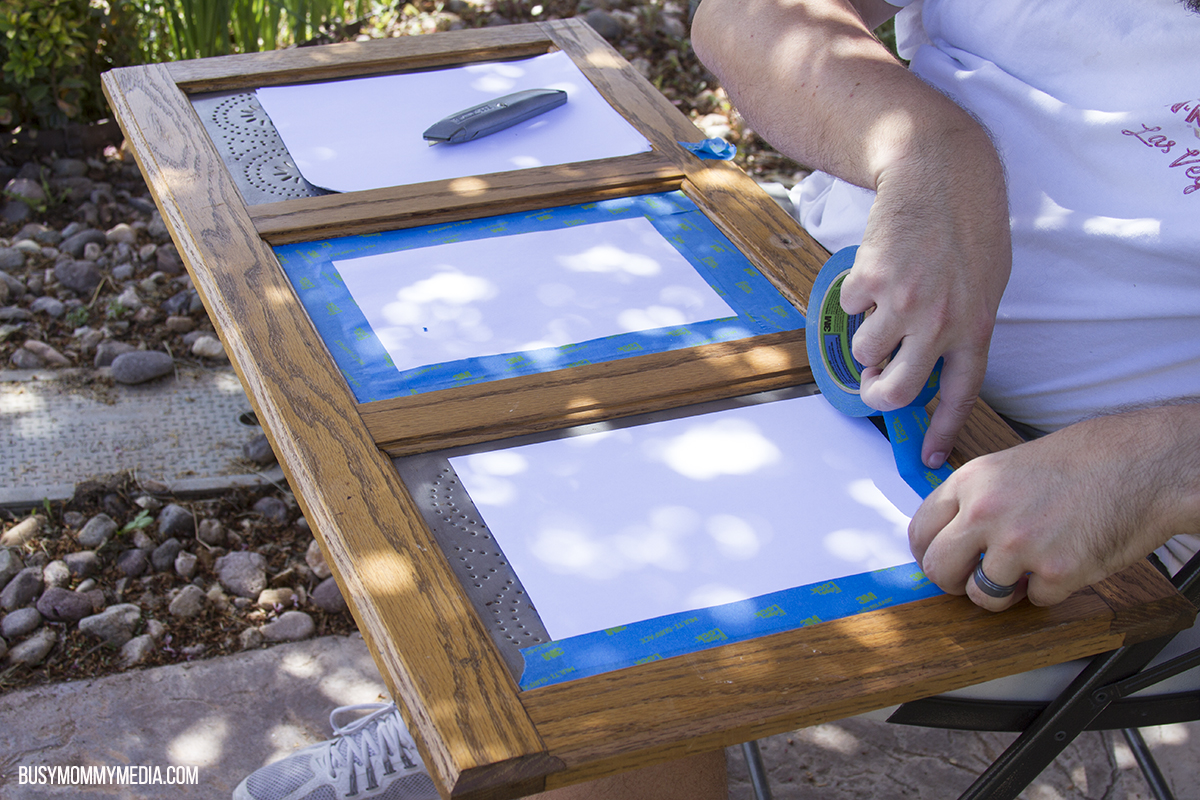
Don’t rush this step. It will take you a lot longer to fix a problem if you don’t tape off your project well.
The bonding primer was our first coat. We put this in the Wagner Home Decor Paint Sprayer to get an even coat. It was just a bit thick for the sprayer so we did add a bit of filtered water.
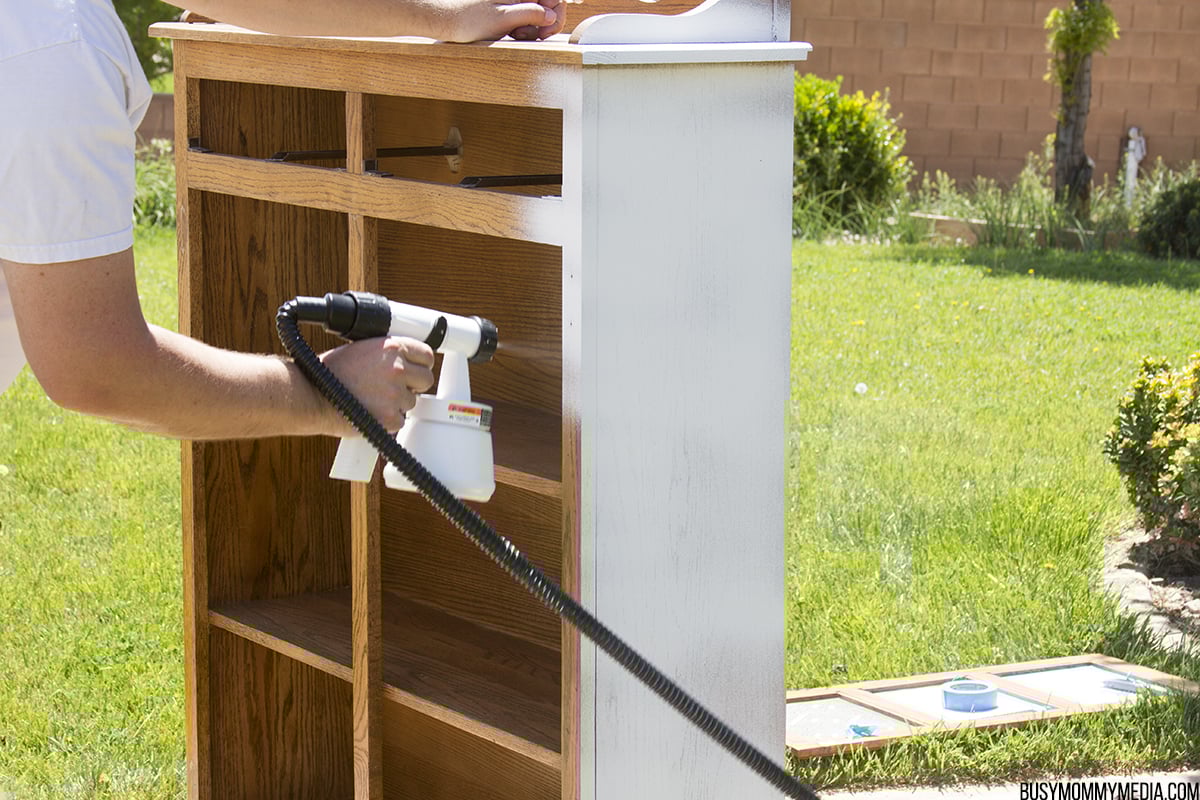
We let that dry completely. It was a hot day so it was dry in less than an hour.
We rinsed the paint sprayer well and filled it with the paint to do the coat of paint.
Let it dry completely (and then some) before putting the doors and any hardware back on.
I love the bright white that we used on this (it was Sherwin Williams Snowbound). This is the same color I was thinking of painting my basement kitchen cabinets if I ever get brave enough to tackle that project.
How to get clean paint lines
I mentioned earlier that we have struggled with our taping skills. We’ve found really pressing down the tape and letting it settle for a few minutes before starting to paint helps. Use a tool to press it down. We bought a long metal tool for our last project designed to do just that. It was too long for what we needed here so we used the side of a blade.
Take your time when taping to be sure you get your tape exactly where you need it to go.
After painting, remove your tape as soon as possible. This is super important. I used to wait until the paint was dry. If you remove the tape while the paint is wet, you won’t have dry paint peeling away as you remove the tape.
I waited a bit too long on this because two-sided things make that a bit trickier, but the spaces I removed the tape right away ended up with much cleaner lines.
I have a few places I need to touch things up or scrape paint off, but we ended up doing much better this time around. There may be hope for me yet.
The end result?
In the end, my pie safe is a gorgeous bright white and it really did a lot to lighten up the room. Now I just have to decide if I’m going with some more rustic reds in my kitchen or the cooler blues. What do you think? Tell us on Instagram.
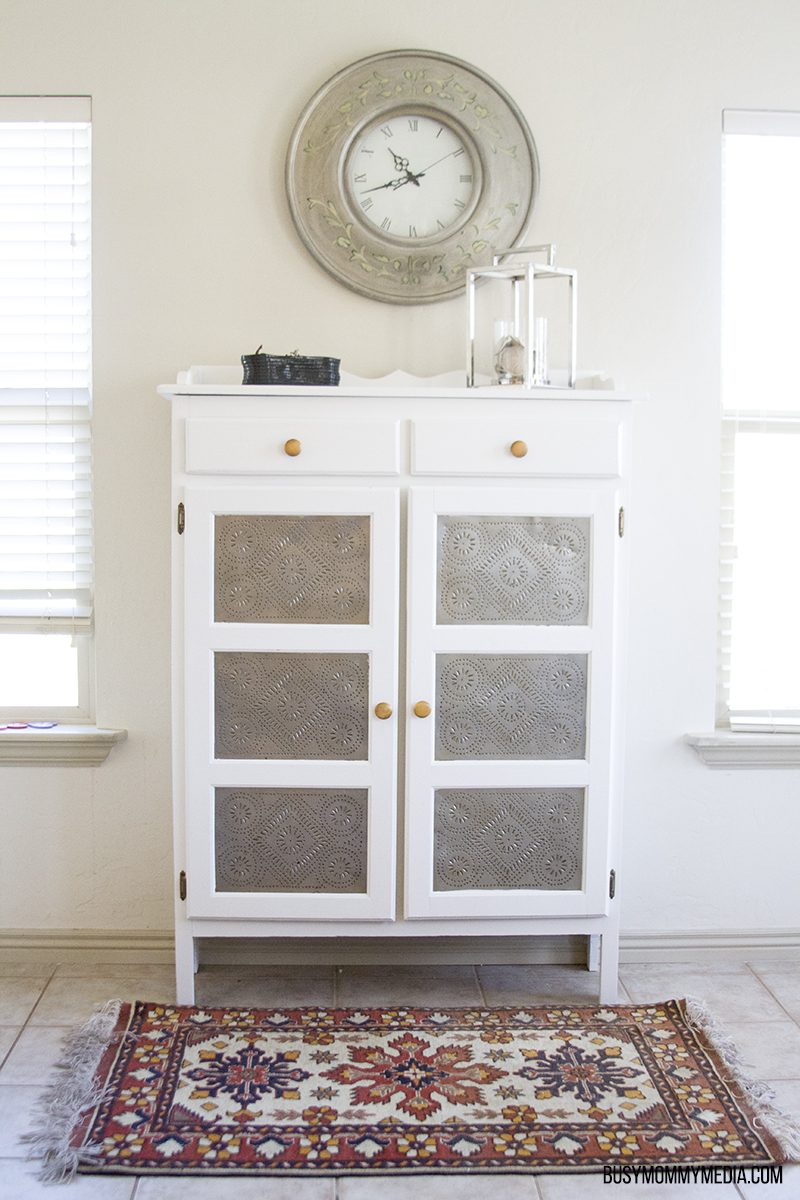
There’s such a difference when I look at the before and after. Now I’m off to see what else I can paint!